Crochet Cardigan Pattern: Easy Bell Sleeve Cardigan Tutorial
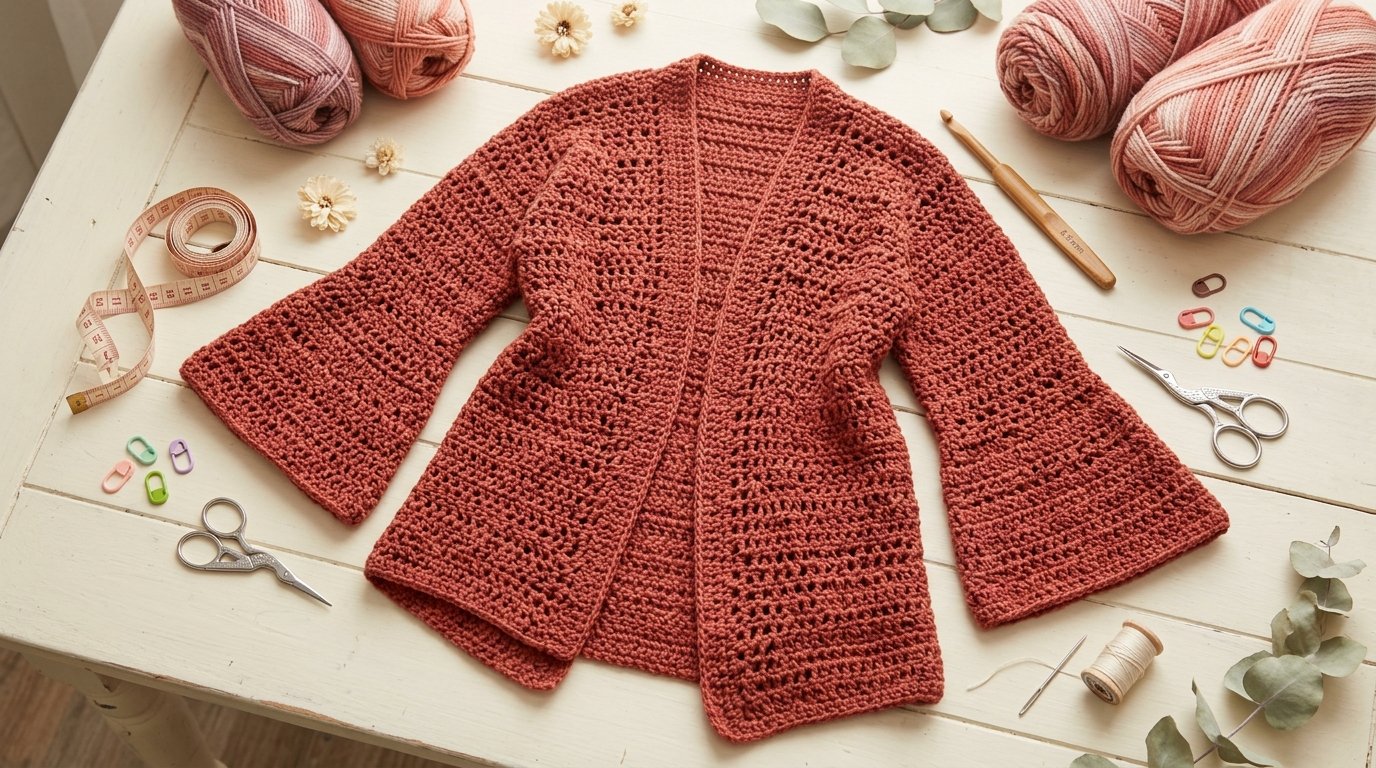
If you have been looking for a crochet cardigan pattern that looks elegant but isn’t built from lots of complicated pieces, this is a lovely project to try. I especially like this style because the finished cardigan has a beautiful flowy shape, an asymmetrical hem, and feminine bell sleeves, while the main body is surprisingly simple to construct.
This cardigan is worked mainly as a large rectangle, with openings left for the sleeves. The sleeves are then crocheted directly onto the body. That means there is much less sewing and joining than you might expect from a handmade cardigan.
The original design uses a lightweight worsted-weight yarn and a 6.5 mm crochet hook, giving the fabric a soft, open drape. It is available in four sizes, making it suitable for crocheters who want to make a cardigan for different body measurements.

In this tutorial, I’ll walk you through the five most important parts of making this type of crochet cardigan: choosing your materials, checking gauge, making the body, adding the bell sleeves, and finishing the garment.
1. Crochet Cardigan Materials
Before starting, gather everything you need. Having your materials ready makes a larger crochet project much easier to manage.
Materials
- Lightweight worsted-weight yarn
- 6.5 mm crochet hook
- Measuring tape
- Scissors
- Yarn needle
- Stitch markers
- Crochet pattern or written instructions
- Blocking supplies, if desired

For the original pattern, Lion Brand Heartland is used. The estimated amounts are approximately:
| Size | Approx. Yarn Needed |
|---|---|
| Small | 1,510 yards |
| Medium | 1,760 yards |
| Large | 2,010 yards |
| Extra Large | 2,010 yards |
These amounts can change depending on your crochet tension and whether you use the recommended yarn or a substitute.
Recommended Product: Lion Brand Heartland Yarn

I would choose this yarn if you want to stay close to the original pattern specifications. It is a good option for a wearable cardigan because the yarn weight works well with the larger hook and open stitch texture.
2. Crochet Cardigan Gauge and Sizing
Don’t skip the gauge swatch.
I know making a small square before starting a large project isn’t always exciting, but it can save you from making an entire cardigan that doesn’t fit.
Your crochet tension affects:
- Width
- Length
- Sleeve size
- Overall drape
- Yarn consumption
The original cardigan pattern uses a 6.5 mm/K crochet hook.

If your stitches are very tight, your fabric may become smaller and denser. If you crochet loosely, your cardigan may turn out larger and more open.
How to Make a Gauge Swatch
Using your chosen yarn and 6.5 mm hook:
- Make a foundation chain.
- Work the stitch pattern used for the cardigan.
- Continue for several rows.
- Lay the swatch flat without stretching it.
- Measure the stitches across the center.
- Measure the rows vertically.
- Compare your measurements with the pattern gauge.
If your swatch is too small, try a larger hook.
If your swatch is too large, try a smaller hook.
Don’t change your yarn immediately. Adjusting the hook size is often the easiest first step.
Choosing Your Size
The cardigan is designed in four sizes:
- Small
- Medium
- Large
- Extra Large
I recommend measuring your body before choosing your size.
Measure around your bust and compare that measurement with the finished garment measurements in the original pattern.
For a relaxed cardigan, you may prefer additional ease, but remember that the design already has a loose, flowing shape.
3. Crochet the Main Cardigan Body
This is the part that makes the pattern especially approachable.
Instead of crocheting a front panel, back panel and separate sleeve pieces, the main body is created as a large rectangle.
The rectangle forms the basic cardigan shape.

Step 1: Make the Foundation Chain
Start with the foundation chain required for your chosen size.
The number of chains will determine the width of your cardigan, so check your gauge before deciding that the chain is the correct length.
Don’t crochet tightly into the foundation chain.
If your foundation chain is much tighter than the rest of your rows, the bottom edge can pull inward.
Step 2: Work the Main Stitch Pattern
Continue working across the foundation chain using the stitch pattern specified by the original pattern.
Keep your tension consistent throughout the rows.
As you work, periodically check:
- Stitch count
- Row count
- Width
- Length
- Edge straightness
If you notice your rectangle becoming wider or narrower, stop and correct the problem early.
It is much easier to undo a few rows than half of a cardigan.
Step 3: Create the Sleeve Openings
Once the main body reaches the required size, you’ll create the openings where the sleeves will be attached.
This is one of the clever parts of the construction.
You don’t need to make a separate sleeve and sew it onto the body afterward. The cardigan’s sleeves are worked directly onto the main piece.
Place stitch markers where the sleeve openings should begin and end.
Check both sides carefully so the openings are positioned evenly.
Step 4: Check the Body Shape
Before beginning the sleeves, lay the cardigan flat.
Look at the overall shape.
The body should have enough width to wrap comfortably around you, while the length should create the relaxed, flowing appearance of the finished cardigan.
This is also a good time to try it on.
If you’re making the cardigan for yourself, gently hold the piece around your shoulders and check the placement of the sleeve openings.
4. Crochet the Bell Sleeves
Now comes the part that really gives this cardigan its personality.
The bell sleeves start narrower and gradually become wider toward the cuffs.
This creates the soft, dramatic shape associated with bell-sleeve cardigans.

Step 1: Attach Your Yarn
Attach the yarn at the sleeve opening.
Work around the opening according to the pattern instructions.
Make sure your stitches are evenly distributed.
If you place too many stitches around the opening, the sleeve may become too full at the top.
Too few stitches can make the sleeve tight or pull the body of the cardigan.
Step 2: Work the Sleeve Rows
Continue working the sleeve stitch pattern.
Keep checking your tension.
The sleeve should hang naturally rather than becoming stiff.
The large 6.5 mm hook helps create the open fabric needed for a lightweight, flowing sleeve.
Step 3: Shape the Sleeve
The sleeve uses shaping to create its gradual flare.
Follow the pattern’s decrease and increase instructions carefully.
This is where stitch counting becomes especially important.
If you accidentally miss a decrease or add an extra stitch, the sleeve shape can change.
For the best result, count your stitches at the end of each shaping row.
Step 4: Create the Bell-Sleeve Flare
As you continue toward the cuff, the sleeve becomes wider.
This creates the bell effect.
Don’t pull your stitches too tightly.
The beauty of this design comes from the combination of the open stitch texture and flowing shape.
When the first sleeve is finished, compare it with the second sleeve before moving on.
If both sleeves match in size and shape, continue with the second sleeve.
5. Finishing Your Crochet Cardigan
You’ve done the majority of the crocheting, but don’t rush through the finishing stage.
This is where the garment starts looking polished and ready to wear.

Weave in Your Ends
Use a yarn needle to carefully weave the loose yarn tails into the back of the crochet fabric.
Weave the ends through several stitches.
For a garment that will be worn and washed, don’t leave short tails that can easily come loose.
Trim the excess yarn after securing it.
Check the Edges
Look carefully around:
- Sleeve openings
- Sleeve cuffs
- Cardigan edges
- Corners
- Asymmetrical hem
If you see a loose stitch or uneven edge, fix it before blocking.
Blocking
Blocking can help improve the final shape of your cardigan.
Lay the cardigan flat on a clean blocking surface.
Gently shape the garment to the desired measurements.
Don’t stretch it aggressively.
The goal is to encourage the stitches to settle into an even shape while maintaining the natural drape of the fabric.
Always consider the fiber content of your yarn before deciding which blocking method to use.
My Recommended Crochet Hook
Clover Amour 6.5 mm Crochet Hook

For a project this large, I would choose a comfortable ergonomic hook.
The 6.5 mm size matches the hook size used by the original pattern, making it a practical choice if you’re following the pattern closely.
Crochet Cardigan Pattern at a Glance
Here’s the project in a simple step-by-step format:
Step 1 — Choose your yarn
Use a lightweight worsted-weight yarn similar to the original recommended yarn.
Step 2 — Choose your hook
Use a 6.5 mm crochet hook.
Step 3 — Make your gauge swatch
Check your stitch and row measurements before starting the garment.
Step 4 — Choose your size
Measure your body and select the size that gives you the amount of ease you want.
Step 5 — Crochet the body
Work the main cardigan as a large rectangle.
Step 6 — Leave sleeve openings
Follow the pattern measurements to position the openings correctly.
Step 7 — Add the sleeves
Work the sleeves directly onto the cardigan body.
Step 8 — Shape the sleeves
Follow the decrease and shaping instructions to create the bell-sleeve effect.
Step 9 — Finish the edges
Weave in all yarn ends and inspect the cardigan carefully.
Step 10 — Block
Gently shape the finished garment and allow it to dry completely.
Tips for a Better Crochet Cardigan
Keep Your Tension Consistent
Don’t crochet the first few rows extremely tightly and then relax your tension later.
Changing tension can change the size of the garment.
Measure as You Go
Don’t wait until the end.
Check the body after several rows and check the sleeve after completing the first section.
Make One Sleeve First
Finish one sleeve and inspect it carefully before making the second.
This gives you an opportunity to catch mistakes early.
Don’t Overload the Cardigan With Heavy Yarn
The beauty of this design is its drape.
A very heavy yarn can make the cardigan feel bulky and may reduce the flowing effect of the bell sleeves.
Take Your Time
A cardigan is a larger project, so there is no need to finish it in one or two sittings.
I prefer breaking a project like this into manageable sessions:
Day 1: Gauge and foundation
Day 2–3: Main body
Day 4: First sleeve
Day 5: Second sleeve
Day 6: Finishing and blocking
Of course, your own crochet speed will determine how long the project takes.
Final Thoughts
This crochet cardigan pattern is a great example of how an interesting construction can make a garment look much more complicated than it actually is.
The rectangular body keeps the construction relatively straightforward, while the bell sleeves and asymmetrical shape give the finished cardigan a stylish appearance.
If you’re making your first crochet garment, I would focus on four things above everything else:
Use the correct yarn weight, check your gauge, keep your stitch count accurate, and measure as you go.
Those four steps will make the entire project easier.
And once you’ve finished the cardigan, you’ll have more than just another crochet project sitting in your craft room. You’ll have a handmade layer that you can wear with jeans, dresses, skirts, or a simple top.
That’s one of my favorite things about crochet garments: every stitch becomes part of something you can actually use and enjoy.
Pattern source: The construction, yarn information, hook size, sizing and design details in this tutorial are based on the Grace Bell Sleeve Cardigan pattern from Crochet Dreamz. Follow the original pattern for the exact stitch counts and row-by-row instructions.
Affiliate disclosure: This post may contain affiliate links. If you purchase through one of these links, I may earn a small commission at no additional cost to you.