C2C Crochet Bulldog Pattern: How to Make an Adorable Dog Blanket
There is something special about turning a ball of yarn into a handmade project that celebrates a favorite animal. If you love dogs and enjoy crochet, a C2C crochet bulldog pattern is a wonderful way to combine those two interests. With its expressive face, distinctive markings, and charming appearance, a crocheted bulldog can become the centerpiece of a cozy blanket, a decorative cushion, or a thoughtful handmade gift for a dog lover.
In this guide, I’ll walk you through the essentials of making a corner-to-corner (C2C) crochet bulldog square, from choosing the right yarn and hook to following the graph, changing colors, and finishing your project neatly. I’ll also share practical tips to help you avoid common mistakes and get a result you can feel proud of.
What Is a C2C Crochet Bulldog Pattern?
C2C stands for corner-to-corner crochet. Instead of working straight across a traditional row from one side to the other, you build small crochet blocks diagonally, beginning at one corner and increasing the number of blocks until you reach the widest part of your design. You then decrease the blocks to shape the remaining side.
This technique is especially useful for picture-based crochet projects because each block represents a small square on a color graph. By following the graph and using the correct yarn colors, you gradually create an image.
For a bulldog design, the graph helps form the dog’s face, ears, muzzle, eyes, and other distinguishing features. The individual stitches may look simple on their own, but when viewed together, they create an appealing animal portrait.
One of the best things about this technique is its versatility. A single bulldog square can become a pillow cover, wall hanging, or decorative panel. If you want something larger, you can incorporate the square into a blanket alongside other dog-themed designs.
Is This Crochet Bulldog Pattern Suitable for Beginners?
I would recommend this project to crocheters who already understand basic crochet stitches and are ready to try colorwork. Complete beginners can learn it too, but they may find it easier to practice C2C increases, decreases, and color changes before starting the full bulldog graph.
Here are the skills that will help you get started:
- Making a slip knot and chain stitches.
- Working half-double crochet stitches.
- Joining new blocks to previous blocks with slip stitches.
- Increasing and decreasing to shape a C2C square.
- Changing yarn colors without leaving excessive loose strands.
- Reading a crochet graph and keeping track of completed rows.
If you are new to C2C crochet, take time to practice with a small square first. Once you understand how the diagonal blocks connect, following a dog graph becomes much less intimidating.
The original Make & Do Crew design uses half-double crochet C2C blocks to maintain detail while keeping the finished square at a manageable size. According to the pattern, the bulldog square measures approximately 18 × 18 inches when the recommended gauge is achieved.
Materials You Will Need
Gathering your materials before starting makes the project easier to manage. You don’t need an elaborate collection of supplies; the right yarn, a suitable hook, and a few finishing tools are enough.
1. Worsted-Weight Yarn
The original pattern uses Lion Brand Basic Stitch Anti-Pilling yarn, a medium-weight acrylic yarn available in several colors. Its range of shades makes it useful for creating the contrasting areas needed in an animal portrait.
Choose yarn colors that match the graph. The bulldog design includes neutral shades and darker accents, with additional colors used for details. Check the original pattern’s yarn list for the exact colors and quantities before shopping.
If the recommended yarn isn’t available where you live, you can substitute another washable worsted-weight yarn. Try to select yarns of similar thickness and texture so that your crochet blocks remain consistent.
My practical advice is to avoid mixing a very thin yarn with a much thicker one. Even if the colors look perfect together, differences in yarn thickness can distort the finished square.
2. A 5 mm Crochet Hook
The pattern specifies a size H, 5.0 mm crochet hook, or another size that produces the required gauge.
Your personal tension matters here. If your stitches are very tight, the square may turn out smaller than expected. If they’re too loose, it may become larger and the picture can look less defined.
A comfortable hook is particularly useful for projects involving repeated stitches and frequent color changes.
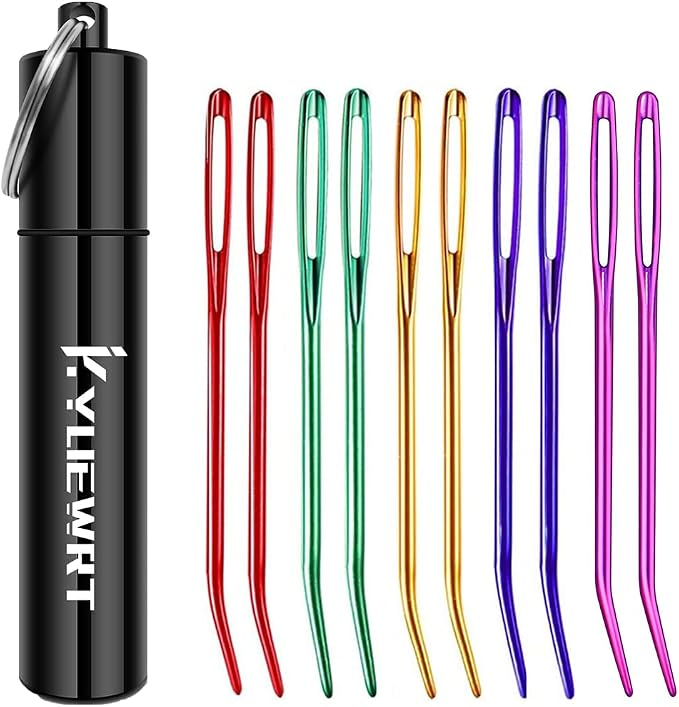
3. A Tapestry Needle
A blunt tapestry needle helps you weave loose yarn ends into the back of the finished square. This is an important finishing step because colorwork creates multiple ends that need to be secured.
Choose a needle with an eye large enough to accommodate your yarn.
4. Graph Pattern and Optional Blocking Supplies
Print the original graph or keep a clear digital copy nearby. You may also find stitch markers, a blocking board, and T-pins useful when finishing the square.
Blocking can help even out the shape and make the edges look neater. Follow the care instructions for your chosen yarn, especially if using steam or heat.

Two Useful Amazon Supplies for This Project
You don’t need to purchase every crochet accessory available. I recommend focusing on tools that directly support the pattern and make the work more manageable.
1. An ergonomic 5 mm crochet hook
An ergonomic hook can be a practical choice if you plan to work on the bulldog square over several sessions. A cushioned handle may feel more comfortable in your hand, although comfort varies from person to person.
Look for a hook that is clearly marked as 5 mm and has a smooth head that allows the yarn to glide without snagging.

2. A blunt tapestry needle set
A tapestry needle is essential for weaving in the yarn ends created by color changes. A small set gives you options for different yarn thicknesses, and blunt tips help you pass through stitches without unnecessarily splitting the yarn.
Understanding the Bulldog Crochet Graph
Before making your first stitch, take a few minutes to study the graph.
Each square in the graph represents one C2C tile. The color of that square tells you which yarn color to use for the corresponding block. As you work through the graph, the blocks combine to form the bulldog’s face.
Remember that a graph is a visual guide, not a substitute for understanding the stitch construction. Follow the original pattern’s instructions for the starting corner, increases, decreases, and joining stitches.
How to Crochet the Bulldog Square
The following overview explains the main stages of the project. For the exact graph and pattern-specific directions, use the instructions provided by Make & Do Crew.
Step 1: Make the First C2C Tile
Start at the corner indicated by the pattern. The original design uses half-double-crochet C2C construction.
In this method, a tile begins with a chain of five. Work a half-double crochet into the third chain from the hook and into the next two chains. This creates the first small block.
Take your time with the first tile. Getting comfortable with the stitch construction will make the later rows easier.

Step 2: Increase the Rows
Continue following the pattern’s increase instructions to build additional blocks along the diagonal.
As the number of tiles grows, the work gradually becomes wider. Keep your tension consistent, and check that the blocks sit neatly beside one another.
It’s worth pausing every few rows to compare your work with the graph. Catching a misplaced block early is much easier than discovering the problem near the end.

Step 3: Follow the Bulldog Graph
Now begin using the graph to determine which color belongs in each tile.
Pay special attention to the dog’s facial features. Small changes in color placement can affect how recognizable the finished portrait looks.
Work methodically from the designated starting corner and follow the row direction carefully. If your graph includes a sequence of repeated colors, count the blocks before beginning that section.

Step 4: Change Colors Carefully
Color changes are one of the most important parts of a picture-based crochet project.
When the graph calls for a new shade, finish the current tile according to the pattern and join the new color at the appropriate point. Avoid pulling the yarn too tightly, as this can make the square pucker.
If a color will appear again in the next row, you may be able to keep it attached. Otherwise, small separate yarn balls can make the work easier to handle.
Try not to carry long strands of unused yarn across the back without considering how they will affect the fabric. Excess yarn can create bulky areas or show through lighter-colored stitches.

Step 5: Work the Decreases
After reaching the widest section, follow the pattern’s decrease instructions to shape the remaining side of the square.
Decreasing reduces the number of tiles in each successive row until you reach the final corner.
Continue checking the graph as you go. The decreasing stage is just as important as the increasing stage for keeping the square’s shape and picture aligned.
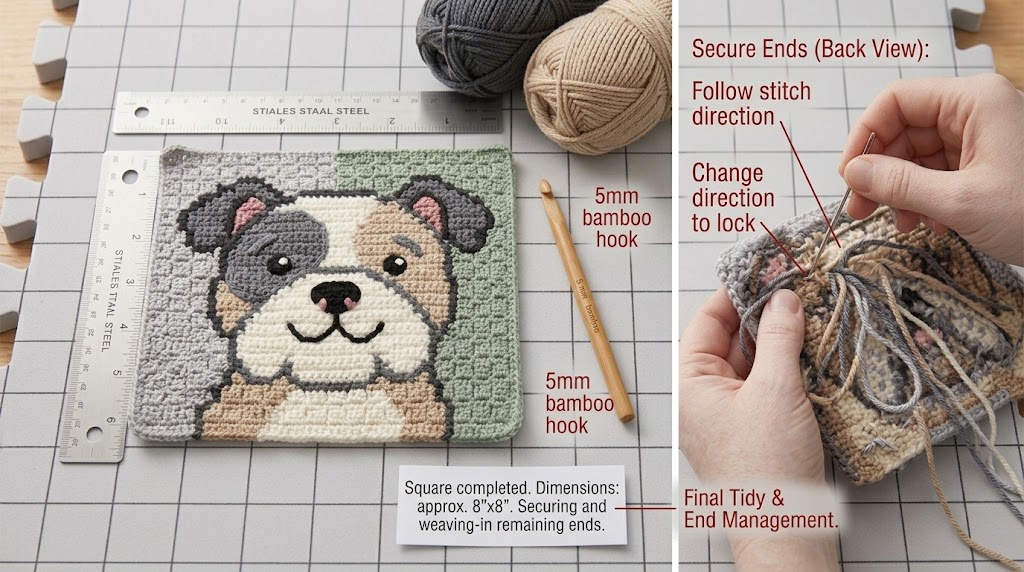
Step 6: Weave in the Ends
Once the square is complete, secure the remaining yarn ends with your tapestry needle.
Weave each end into the back of the fabric, following the direction of nearby stitches and changing direction where appropriate to help secure it. Avoid pulling so tightly that the fabric gathers.
Look carefully at the front of the square. If small gaps appear between color sections, you can tidy the area by adjusting the yarn ends without distorting the stitches.
Step 7: Block the Finished Square
Blocking can help your crochet square look more even and polished.
Pin the piece into the desired shape on a suitable blocking surface, following the yarn manufacturer’s care guidance. Use an appropriate method for your yarn; do not apply direct heat or steam unless the fiber can safely tolerate it.
Allow the square to dry fully before removing the pins.

Tips for Better Colorwork
A few simple habits can make a noticeable difference in the finished bulldog design.
Count each row before moving on. Check that the number of tiles matches the graph. This is particularly helpful around the eyes, muzzle, and ears.
Use good lighting. Clear lighting makes it easier to distinguish similar shades and see individual stitches.
Keep yarn organized. Small balls or bobbins can help prevent the different colors from twisting together.
Check the back of your work. Loose strands and bulky knots can affect how the square lies, especially if you plan to use it in a blanket.
Take breaks when needed. C2C projects involve repeated movements and close attention to counting. Short breaks can help you maintain concentration and comfort.
Creative Ways to Use Your Finished Bulldog Square
Once the bulldog portrait is complete, you can turn it into something useful or decorative.
Make a Dog-Themed Blanket
A single square can serve as a feature panel in a larger blanket. You could surround it with solid-color C2C squares or combine it with other dog portraits.
Create a Decorative Cushion
An approximately 18-inch square can be a good starting point for a decorative cushion, depending on your gauge and preferred fit. Add a fabric backing or crochet a second panel, then assemble the cover using a suitable method.
Choose a washable cushion insert and make sure the finished cover can be cared for appropriately.
Give It as a Handmade Gift
A bulldog square can make a thoughtful gift for someone who loves dogs, especially if the recipient has a bulldog or pit bull.
You can customize the background color or choose shades that complement the recipient’s home. If you are making the item for someone else, consider their preferences for texture, color, and washing requirements.
Common Mistakes to Avoid
One common mistake is changing yarn weight halfway through the project. Even similar-looking yarns can produce different block sizes, so try to use consistent materials throughout.
Another is skipping row checks. A single incorrect color block can disrupt the facial features, so compare your work with the graph regularly.
Finally, don’t rush the finishing stage. Loose ends, uneven edges, and inconsistent tension can make a completed square look less polished than it deserves.
If something looks wrong, pause and identify the cause before continuing. Carefully correcting a small section is often easier than trying to disguise a larger problem later.

Final Thoughts
A C2C crochet bulldog is a rewarding project for anyone who enjoys combining crochet with animal-inspired designs. The graph-based approach allows you to create a recognizable dog portrait using simple crochet blocks, while the finished square offers plenty of possibilities for blankets, cushions, and gifts.
Start with the correct materials, follow the original graph carefully, and pay attention to your tension and color changes. You don’t have to rush. Working a few rows at a time gives you the opportunity to enjoy the process while gradually watching the bulldog’s face take shape.