Recycled Crochet Bag Handle Free Pattern: A Clever 5-Step DIY
I love crochet projects that make me stop and think, “Why didn’t I think of that before?”
This recycled crochet bag handle pattern is one of those projects.
Instead of buying a ready-made bamboo or plastic purse handle, this clever idea uses something that many of us already have at home: a sturdy plastic container lid. After the center is removed, the remaining circular piece becomes the hidden foundation for a crochet-covered bag handle. The original Crochet Dreamz tutorial demonstrates the technique with a size H hook and single crochet stitches worked around the plastic ring.

What I particularly enjoy about this project is that the finished handle doesn’t look recycled at all. Once the plastic is completely covered with yarn, it becomes a neat, handmade crochet accessory that can be paired with a crochet purse or bag.
For me, this is also a great example of how crochet isn’t always about complicated stitches. Sometimes a simple stitch combined with a clever construction method can create something really useful.
So let’s walk through the process in five detailed steps.
1. Choose and Prepare the Plastic Lid
The first step is finding the right plastic lid.

I wouldn’t simply grab the first lid I find. The plastic needs to be sturdy enough to maintain its circular shape once the center is removed.
A good lid should be:
- Firm and reasonably thick
- Clean and completely dry
- Free from cracks
- Large enough for the type of bag you’re making
- Easy to mark and cut
The original Crochet Dreamz tutorial uses a plastic container lid and explains that a visible circular line on the lid can be used as a cutting guide. If your lid doesn’t have one, you can draw your own circle with a marker and another circular object.
My tip for choosing the lid
Before cutting anything, place the lid beside your crochet bag.
Imagine the finished handle attached to the bag and consider whether the diameter feels appropriate.

A very small ring might work beautifully on a little crochet purse but look undersized on a large tote. Likewise, an oversized ring can overwhelm a small handbag.
Cutting the lid
This is the one part of the project where I would slow down.
The original tutorial recommends making a slit near the edge of the inner circle and then inserting scissors through the opening to cut around the marked circle.
Because you’re working with plastic, use an appropriate cutting tool carefully and protect your fingers and work surface.
After cutting, inspect the ring carefully.

You want a smooth circular foundation without obvious sharp or jagged edges.
This foundation will eventually be hidden beneath the crochet stitches, but it still needs to be safe and structurally sound before you continue.
2. Start Covering the Ring With Yarn
Once the plastic ring is ready, the fun crochet part begins.
The original tutorial uses a size H crochet hook. It starts by placing a slip knot on the hook behind the plastic ring and securing the yarn around the ring with a slip stitch.
This first connection is important because it establishes the foundation for all the stitches that follow.

I like to think of the plastic ring as a framework and the yarn as the fabric that is gradually wrapping around it.
Starting the first stitch
Once your yarn is secured, you’re ready to begin single crochet.
The basic movement is:
- Insert your hook through the center opening of the ring.
- Yarn over.
- Pull up a loop to the level of the outer edge.
- Yarn over again.
- Pull through both loops on the hook.
That creates one single crochet around the plastic ring.
Then you repeat the process.
The original tutorial illustrates this technique with single crochet stitches worked continuously around the entire circle.
Why I like single crochet here

Single crochet is a particularly practical choice for this type of project because it creates a relatively compact fabric.
You aren’t trying to create a lacy handle where the plastic foundation is visible.
Instead, the goal is to cover the foundation completely.
That means consistent stitches and good tension matter more than complicated stitch patterns.
3. Build an Even Crochet Cover
This is where the handle really starts to take shape.
As you work around the ring, you’ll notice that the stitches can spread apart.
If you simply keep crocheting without adjusting them, you may end up with sections where the plastic shows through.

I recommend moving the stitches close together after every few stitches to achieve a smoother finish.
I think this is one of the most important details in the entire project.
Don’t wait until the end
Instead of crocheting around the whole ring and hoping everything looks right, stop every few stitches.
Look at the section you’ve just completed.
If the stitches are spreading apart, gently push them together.
Then continue.
This gives you much more control over the finished appearance.
Think about tension
You want your stitches to be firm enough to cover the plastic but not so tight that working becomes uncomfortable.
If your stitches are too loose, you may see the plastic foundation.
If they’re excessively tight, you may struggle to insert the hook through the ring repeatedly.
A comfortable, consistent tension is what I would aim for.
Choosing Yarn for Your Recycled Handle
This is also a great place to experiment with color.
For a soft feminine crochet bag, I love the idea of:
- Blush red
- Dusty rose
- Cream
- Warm beige
For a more classic bag, try:
- Black
- White
- Tan
- Chocolate brown
For something cheerful, you could use:
- Coral
- Pink
- Yellow
- Sage green
You can match the handle to the body of the bag or deliberately choose a contrasting color.
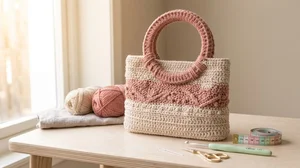
For example, a cream crochet bag with a light-red handle would create a beautiful handmade look.
4. Finish the Handle Neatly
Once you’ve worked single crochet around the entire ring, the plastic should be completely covered.

At this point, take a moment to inspect your work.
Look for:
- Exposed plastic
- Uneven stitch spacing
- Loose stitches
- Large gaps
- Areas where the yarn has bunched together
If you find a problem, it’s much easier to correct it now than after attaching the handle to your bag.
Once you’re happy with the coverage, fasten off and deal with the yarn tail.
The original tutorial recommends using a yarn needle to weave in the ends.
Amazon product : Clover Amour Crochet Hook
For this project, the original tutorial uses a size H hook.
A comfortable ergonomic crochet hook is one of the few purchases I think can genuinely make a difference when you’re working repetitive stitches.

I particularly like ergonomic-style hooks because the handle gives my fingers something comfortable to hold while I repeat the same movement around the ring.
What I would look for: a smooth hook, comfortable handle, and the correct size for the yarn and pattern you’re using.
If you purchase one for this project, remember that hook sizing systems can vary by country, so check that the listed measurement corresponds to the required size.
5. Attach Your Finished Handle to a Crochet Bag
Now comes the exciting part: turning the recycled ring into part of an actual crochet bag.
The handle can be attached to a bag you’ve already made, or you can design a new crochet bag specifically around your recycled handles.
Before sewing it permanently, I recommend placing the handle against the bag and checking the position.

Look at it from the front.
Then look at it from the side.
Make sure both sides are positioned evenly.
Check the handle height
If you’re making two handles, measure the position of each one.
Even a small difference can make a finished handbag look slightly crooked.
I like to use stitch markers or removable markers to indicate exactly where the handle will be attached before sewing.
Reinforce the attachment
This is especially important if your finished bag will carry anything heavier than lightweight accessories.
A handle isn’t just decorative. It experiences tension whenever the bag is lifted.
For a small decorative purse, the attachment can be relatively simple.
For a larger everyday bag, I would reinforce the connection with several secure passes of yarn or suitable sewing thread.
Test the finished bag with light weight first rather than immediately filling it with heavy items.
A Tapestry Needle Is Surprisingly Useful
If you crochet bags regularly, a good tapestry needle is one of those tools I think is worth keeping nearby.
I use one for:
- Weaving in yarn ends
- Joining crochet pieces
- Securing bag handles
- Finishing seams
- Attaching decorative elements
Amazon product : Large-Eye Tapestry Needle Set
For this project, I would choose a large-eye tapestry needle that makes threading crochet yarn easy.

The important thing isn’t buying the most expensive needle. It’s choosing one with an eye that accommodates your yarn comfortably and a shape that’s easy to maneuver through crochet stitches.
A small needle set is also practical because different projects call for different needle sizes.
My Detailed Pattern Workflow
If I were making this recycled crochet bag handle today, this is the workflow I’d follow.
Step 1 — Select the lid
Choose a clean, sturdy plastic lid with a suitable diameter.
Step 2 — Mark the circle
If the lid doesn’t already have a circular guide, use a marker and another circular object to create one.
Step 3 — Cut out the center
Carefully create an opening and cut around the marked circle until you’re left with a ring.
Step 4 — Inspect the plastic
Check the entire ring for cracks or sharp edges.
Step 5 — Attach the yarn
Create a slip knot and secure the yarn around the ring.
Step 6 — Begin single crochet
Insert the hook through the center opening and work single crochet around the plastic.
Step 7 — Push stitches together
Every few stitches, gently move the crochet stitches close together so the plastic doesn’t show.
Step 8 — Continue around
Keep working until the entire ring has a consistent crochet covering.
Step 9 — Fasten off
Finish the final section neatly.
Step 10 — Weave in the ends
Use a tapestry needle to hide and secure the yarn tail.
Step 11 — Attach to your bag
Position the finished handle evenly and sew it securely into place.
The original tutorial’s sequence follows this same overall construction: prepare the lid, secure the yarn, work single crochet around the ring, finish, and weave in the ends.
Common Problems and How I’d Fix Them
The plastic is showing
This usually means the stitches aren’t packed closely enough.
Try gently pushing the completed stitches together as you work.
You can also check your tension.
The handle looks uneven
Don’t automatically assume the crochet stitches are the problem.
The plastic ring itself may have been cut unevenly.
Before crocheting, make sure your foundation ring has a reasonably consistent shape.
The stitches are extremely difficult to work
Your yarn may be too thick for the hook/ring combination, or your tension may be too tight.
Try relaxing your grip and making each loop slightly more comfortable.
The handle twists
Check whether the plastic ring was cut evenly.
Also check that your stitches aren’t pulling disproportionately on one side.
The ring should remain flat while you work.
The finished handle feels weak
A recycled lid is best suited to a project where its strength matches the intended use.
For a very large or heavy bag, I would consider a stronger commercial handle or additional reinforcement rather than assuming every plastic lid is suitable for heavy loads.
Why I Think This Is Such a Fun Crochet Project
What makes this pattern special to me isn’t the complexity.
It’s the idea behind it.
The original tutorial describes the project as a way to create a circular bag handle using things found at home and yarn, offering an alternative to purchased circular bamboo handles.
That’s a wonderful reminder that crochet can be creative in more ways than simply choosing a stitch.
You can change the materials.
You can reuse something.
You can solve a small problem with materials already sitting in your home.
And you can customize the finished result to match your own style.
Once you’ve learned this technique, you may even start looking at other sturdy circular objects differently.
Final Thoughts
I think this recycled crochet bag handle free pattern is a wonderfully creative project for anyone who enjoys crochet bags, handmade accessories, and upcycling.
The construction is surprisingly simple: create a circular plastic foundation, cover it with single crochet stitches, finish the yarn neatly, and attach the completed handle to your bag.
For me, that’s what makes this project worth trying. It takes an ordinary piece of plastic and turns it into something that looks like a deliberately designed part of a handmade handbag.
And once you make one, you’ll probably start thinking about what other crochet projects could benefit from the same idea.